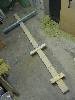
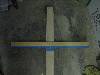
Trellis, an easy project ya think? Not so. At least I don’t think so. On my first attempt last year (2003) I thought so too, so I cut out all the strips, glued them together at the base, fanned out the strips, and glued and nailed the cross supports. Even put in an ornate diamond support ( this one only has an upside down “V”). Thought it looked pretty darn good so I let the glue set overnight. Next day I stood it up, whoops! The cross braces were crooked, as was the diamond. No way was this going out in my yard to showcase my woodworking skills. It did make very nice kindling. Even though I was very careful, or so I thought, making sure the cross braces were perpendicular to the center rib, it just wasn’t meant to be so. I then realized that the best way to make a Trellis, one that I would not be ashamed of and proud to show in my yard, a jig would be necessary to position the ribs and hold them in place while the cross braces were glued and fastened to the ribs.
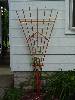
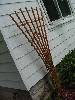
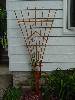
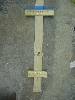
So, this year I made the jig you see, and the end result is the rather picturesque Trellis you see here. The Trellis stands 6’ 6” and is made out of Cypress fastened with stainless steel screws, Polyurethane glue, and some epoxy glue, with one coat of a 5-year Behr Weatherproofing Sealer and Finish. The Trellis is free standing, and in order to insure it stays that way, two 8’ copper grounding rods were sunk to a depth of ~6’. Two 5’ pieces of ˝” copper pipe were then fastened to the back of the Trellis at two points each, once again using stainless steel screws, and the completed assembly was slipped over the two copper grounding rods, with the ˝” pipe sunk to a depth of ~3’. Between the use of Cypress as the material and the Behr Weatherproofing I don’t think I’ll have to make a replacement Trellis any time in the near future. Now the real question is, to save or not to save the jig?
|